
Sync Form Data to Google Sheets or Airtable with Webhooks
Problem: Form responses pile up in the form builder. You copy them into Google Sheets or Airtable by hand—or export CSV and re-upload. It’s slow, error-prone, and never real time.
Solution: Use webhooks to send every form submission to a URL that appends a row to Google Sheets or creates a record in Airtable. One webhook, form data sync in real time—no manual export, no Zapier/Make required if you host a small endpoint. For other webhook use cases, see send form submissions to your CRM, instant lead notifications with webhooks, and form webhooks for developers.
This guide is for ops, marketers, and no-code users who want form data in Google Sheets or Airtable (or any API that accepts JSON) without Zapier/Make or manual steps. You’ll see the payload shape, how to add a webhook, and examples for Sheets and Airtable via a small backend or serverless function.
What you get
- Every submission sent as an HTTP POST to your webhook URL (e.g. a serverless function or app that writes to Sheets/Airtable).
- Structured payload with event type, IDs, timestamp, and data.responses (all form fields keyed by block label) so you can map them to columns or fields.
- Optional signing secret so your endpoint can verify the request.
- Delivery history in the app: status (PENDING, SUCCESS, FAILED), response code, and Retry for failed or pending deliveries.
Google Sheets and Airtable don’t expose a raw “POST JSON here” webhook URL. You use a thin backend (e.g. Google Apps Script Web App, Cloud Function, or Airtable Automation + webhook) that receives our POST and then calls the Sheets API or Airtable API to append a row or create a record.
Webhook payload template (form_response)
Each form submission is POSTed as JSON. Headers include Content-Type: application/json, User-Agent: Jupiter-Forms-Webhook/1.0, X-Jupiter-Event-Id, X-Jupiter-Event-Type, and (if you set a secret) X-Jupiter-Signature. Body shape:
{
  "event_id": "550e8400-e29b-41d4-a716-446655440000",
  "event_type": "form_response",
  "created_at": "2026-02-15T14:32:00.000Z",
  "data": {
    "form": { "id": "form-uuid", "title": "Quote request", "slug": "quote" },
    "session": {
      "id": "session-uuid",
      "status": "COMPLETED",
      "started_at": "2026-02-15T14:31:00.000Z",
      "completed_at": "2026-02-15T14:32:00.000Z",
      "metadata": {}
    },
    "responses": {
      "Name": { "blockId": "b1", "blockType": "SHORT_TEXT", "responses": { "text": "Jane Doe" } },
      "Email": { "blockId": "b2", "blockType": "EMAIL", "responses": { "email": "jane@company.com" } },
      "Company": { "blockId": "b3", "blockType": "SHORT_TEXT", "responses": { "text": "Acme Inc" } },
      "Message": { "blockId": "b4", "blockType": "LONG_TEXT", "responses": { "text": "Requesting a quote" } }
    }
  }
}
Your endpoint maps data.responses (keyed by block label; each has blockId, blockType, responses) and data.session / created_at to your sheet columns or Airtable fields, then returns 2xx.
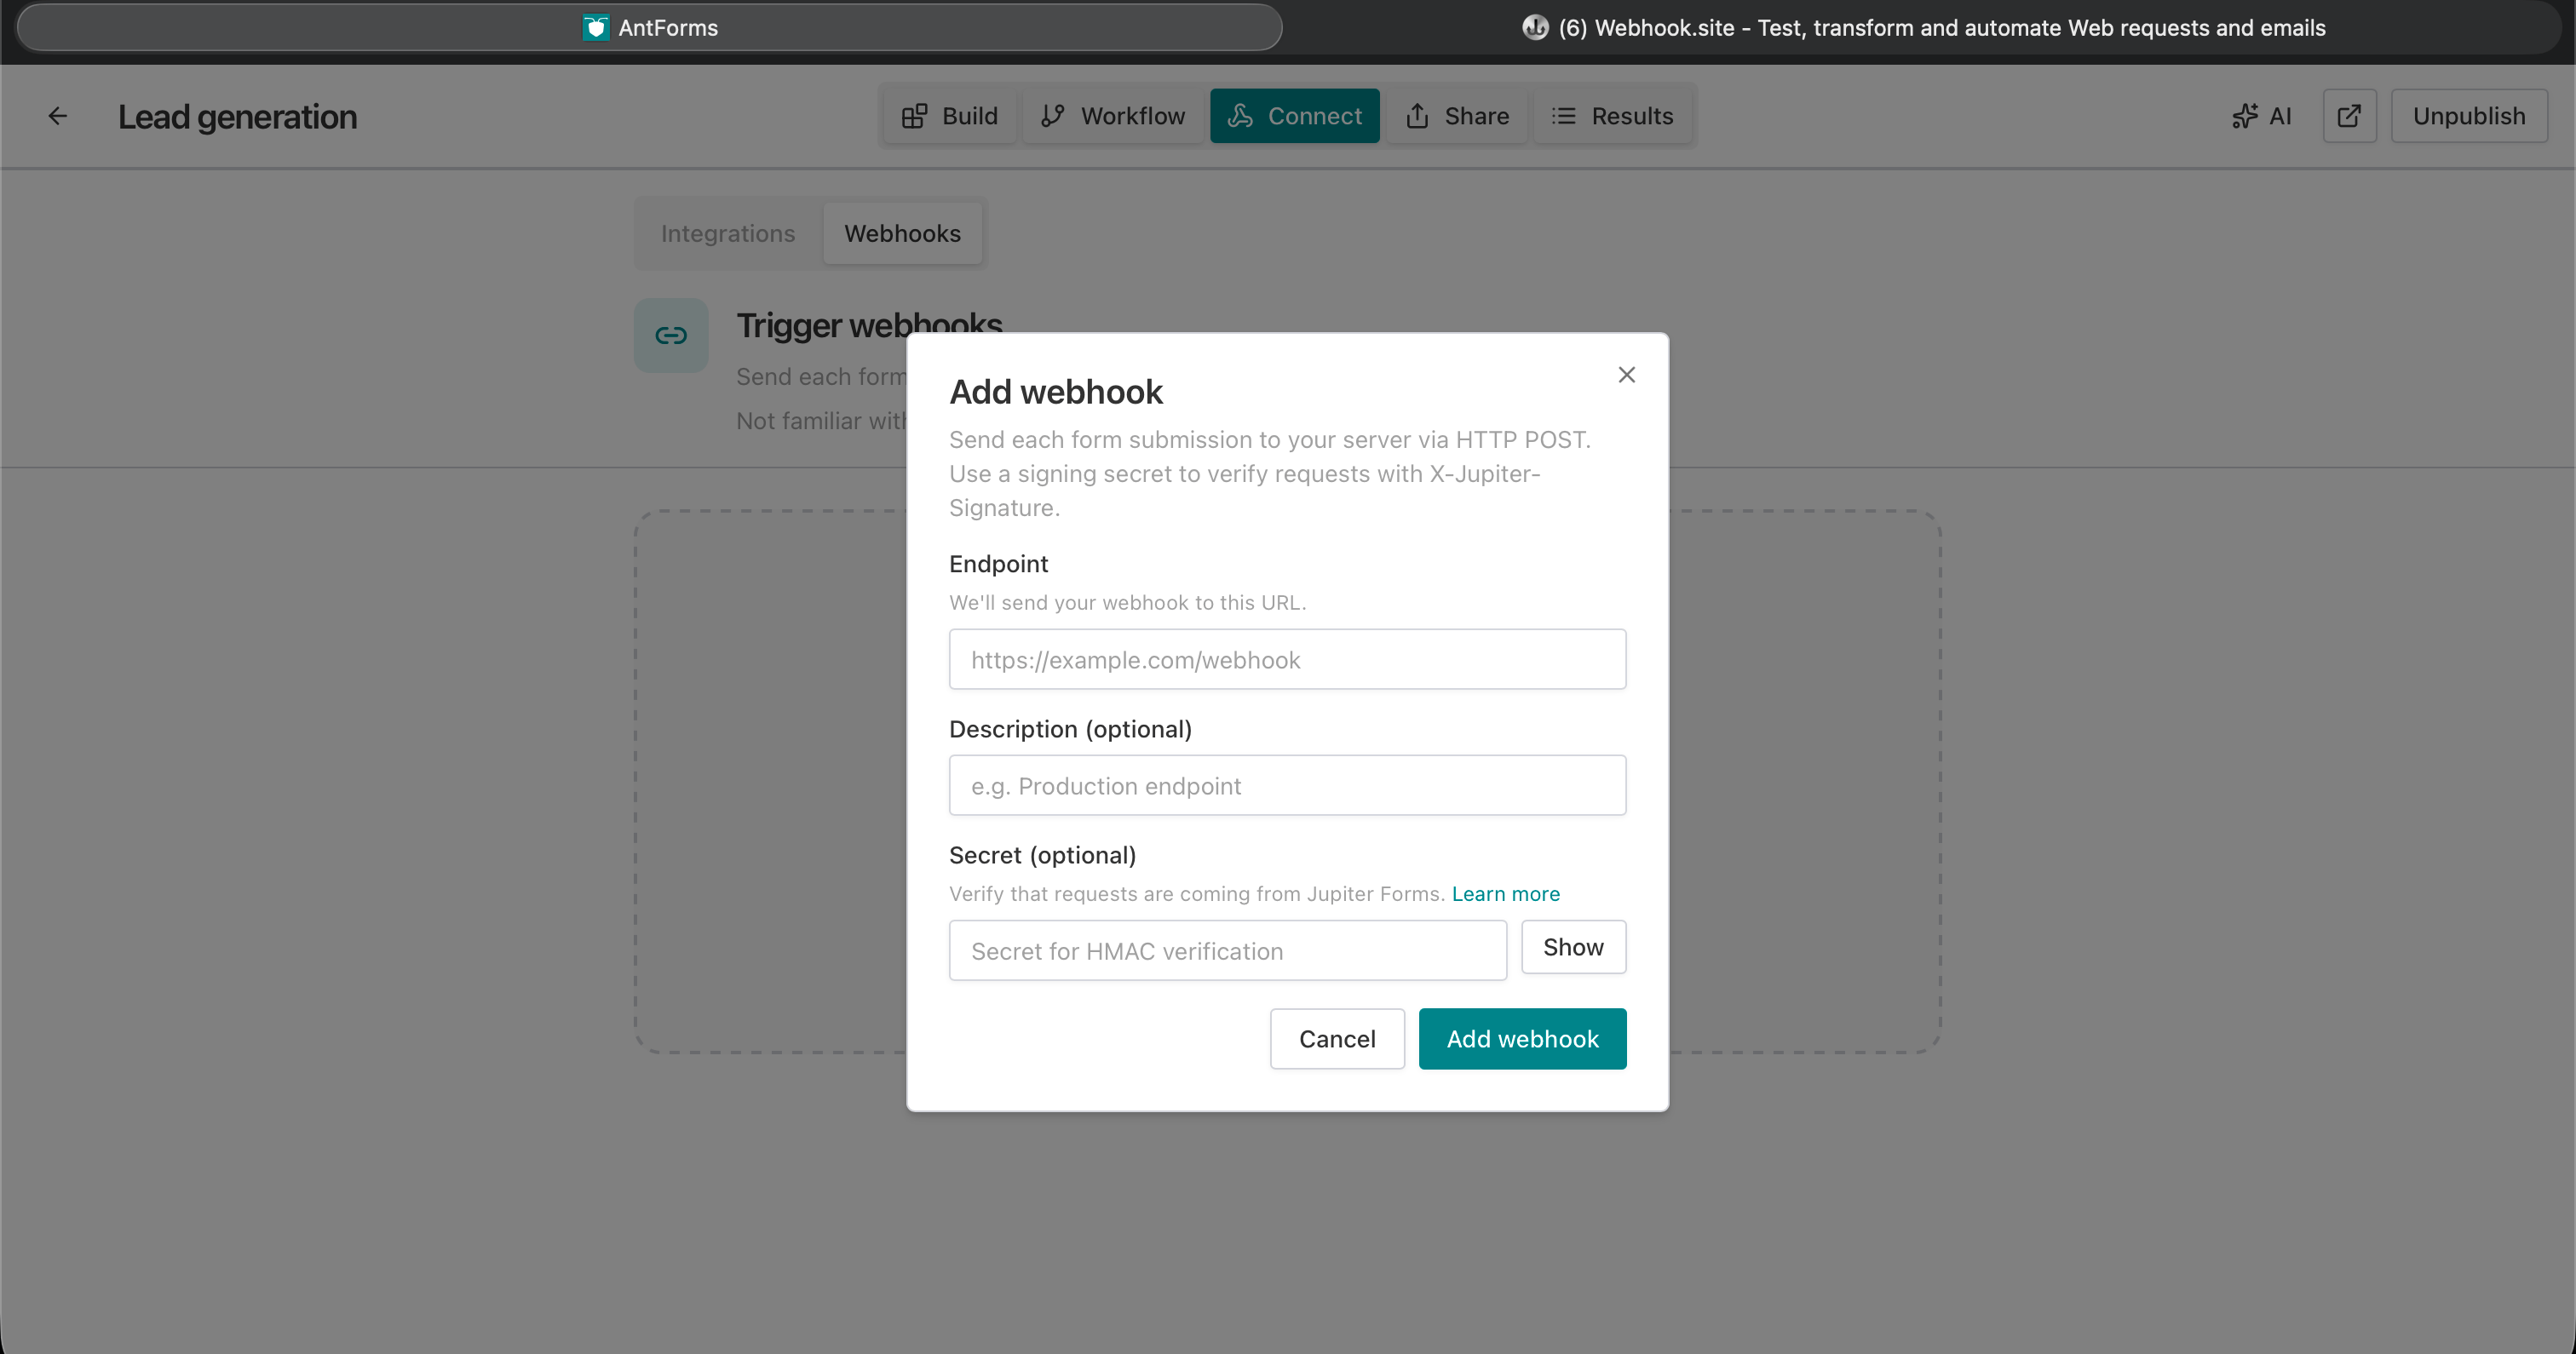
How to add a webhook (quick steps)
- Form → Integrations → Webhooks — Open your form, go to Integrations (Connect), then Webhooks.
- Add webhook — Enter the Endpoint URL (HTTPS, max 2048 characters). This must be a URL that you host (e.g. Google Apps Script Web App, Cloud Function, Vercel/Netlify serverless, or Airtable’s automation webhook trigger if your plan supports it).
- Optional: Description (e.g. “Leads → Google Sheet”, max 500 characters) and Secret for signature verification.
- Save — Webhook is enabled; every new submission is POSTed to that URL.
- Deliveries — Use Deliveries to see success/failure; use Send test request to test without submitting the form.
Use case: form responses as rows in Google Sheets
Audience: Ops, marketing, and no-code users who keep form data in a spreadsheet for reporting, shared access, or simple automation.
Goal: Every form submission becomes a new row in a Google Sheet—automatically, in real time—with no copy-paste or CSV import.
How it works:
- Expose an HTTPS endpoint that receives our webhook POST. Options:
- Google Apps Script Web App: Deploy a script that runs
doPost(e). Parsee.postData.contentsas JSON, readdata.responses(keyed by block label) andcreated_at, and append a row viaSpreadsheetApp.getActiveSpreadsheet().getSheetByName('Form Responses').appendRow([...]). - Cloud Function / serverless: Node, Python, etc. Receive POST, call Google Sheets API (or use a library) to append a row, return 200.
- Google Apps Script Web App: Deploy a script that runs
- Add a webhook in the form builder with that endpoint URL.
- On each submit we POST the payload; your endpoint appends one row per submission.
- Check Deliveries to confirm 200s; fix and retry any failures.
Example column order: Timestamp (use created_at; data.session.completed_at is also available and may be null). Then one column per block label (e.g. Name, Email, Company, Message). Read values from data.responses[label].responses.text, .responses.email, etc., depending on block type.
Example: Google Apps Script Web App (append row)
- In Google Sheets: Extensions → Apps Script. Create a script that handles POST:
function getResponse(data, label, key) {
  var block = data.responses && data.responses[label];
  if (!block || !block.responses) return '';
  return block.responses[key] || block.responses.text || '';
}

function doPost(e) {
  try {
    var payload = JSON.parse(e.postData.contents);
    if (payload.event_type !== 'form_response') {
      return ContentService.createTextOutput('Unknown event').setMimeType(ContentService.MimeType.TEXT);
    }
    var data = payload.data || {};
    var sheet = SpreadsheetApp.getActiveSpreadsheet().getSheetByName('Form Responses');
    var row = [
      payload.created_at || '',
      getResponse(data, 'Name', 'text'),
      getResponse(data, 'Email', 'email'),
      getResponse(data, 'Company', 'text'),
      getResponse(data, 'Message', 'text'),
    ];
    sheet.appendRow(row);
    return ContentService.createTextOutput('OK').setMimeType(ContentService.MimeType.TEXT);
  } catch (err) {
    return ContentService.createTextOutput(err.message).setMimeType(ContentService.MimeType.TEXT);
  }
}- Deploy as Web App: Deploy → New deployment → type “Web app” → Execute as “Me”, Who has access “Anyone”. Copy the Web app URL.
- Add webhook in the form builder with that URL. The Apps Script Web App URL is HTTPS and accepts POST; our webhook will send the body as POST.
- Optional: Add a first row in “Form Responses” with headers:
Timestamp,Name,Email,Company,Message. Block labels in your form (e.g. “Name”, “Email”) must match the keys you use ingetResponse(data, 'Name', 'text'); adjust if your form uses different labels.
Note: Our webhook sends Content-Type: application/json and a JSON body. The payload uses event_id, event_type, created_at, and data.form / data.session / data.responses (responses keyed by block label).
Example: Airtable (create record via backend)
Airtable doesn’t give you a public “webhook URL” that creates records directly. You need a small backend that receives our POST and calls Airtable’s API.
- Create an Airtable base with a table (e.g. “Form submissions”) and fields: Name, Email, Company, Message, Submitted at.
- Backend (e.g. serverless function):
- Receive POST, parse JSON, verify signature if you set a secret.
- Map
data.responses(by block label; each hasresponses.text,responses.email, etc.) andcreated_atto Airtable fields, then call Airtable REST API:POST https://api.airtable.com/v0/{baseId}/{tableId}with{ "fields": { "Name": "...", "Email": "...", ... } }and your API key in headers. - Return 200.
- Add webhook in the form builder with your backend’s URL.
Each submission becomes one Airtable record. You can then use Airtable automations, views, and integrations as usual.
Use case: form data in Airtable for no-code workflows
Audience: Teams that run workflows in Airtable (CRM, project intake, content calendar) and collect data via forms.
Goal: Form submissions create records in Airtable so you can trigger automations (e.g. send email, assign task, update another base) without manual entry.
How it works: Same as above—webhook URL points to your backend, backend creates one Airtable record per POST using the Airtable API. No Zapier required if you’re fine hosting a small endpoint.
FAQs — form to Google Sheets / Airtable
Can I point the webhook directly at Google Sheets?
Google Sheets doesn’t have a public “POST JSON = new row” URL. You need a middle layer: Google Apps Script Web App (deployed with “Anyone” access so our servers can POST) or a Cloud Function / serverless that calls the Sheets API. The webhook URL is that Apps Script or function URL.
What about Airtable’s “Webhook” trigger in Automations?
Some Airtable plans have a webhook trigger that creates a record from the request body. If yours does, you can use that webhook URL in the form builder. The payload we send might need to be mapped in Airtable to your field names; use Send test request and check the received body. If the trigger expects a different shape, use a small backend to translate.
How do I verify the webhook request?
Set a secret when adding the webhook. We send X-Jupiter-Signature: sha256=<base64(HMAC-SHA256(secret, raw_body))>. Your Apps Script or backend should verify using the raw request body and the same secret before writing; see the product docs for details.
What if my script or function is slow?
Respond with 2xx as soon as you’ve accepted the request (e.g. after appending the row or creating the record). We retry on 5xx, 429, and timeouts (exponential backoff, up to 5 attempts). Use Deliveries to see timeouts and retries.
Can I have multiple sheets or bases?
Yes. You can add up to 3 webhooks per form. Add one webhook per destination (e.g. one URL for Sheet A, another for Airtable base B). Each submission is sent to every enabled webhook—no need for Zapier or Make if you host a small endpoint.
Where do I add the webhook?
Form → Integrations (or Connect) → Webhooks → Add webhook. Paste your Apps Script Web App URL or serverless function URL (HTTPS). After saving, every new form submission will be POSTed to that URL. Use Deliveries and Send test request to verify the payload and response.
Form data sync and real-time updates
Form data sync to Google Sheets or Airtable via webhooks means form submission to Sheets or form Airtable integration happens in real time—no export, no manual copy. Sync form data to spreadsheet workflows are common for lead lists, event registrations, and feedback logs. Append row Google Sheets and Airtable webhook trigger (or a thin backend that calls the Airtable API) give you form data sync without Zapier Make webhook alternative dependency if you’re willing to host a small endpoint. Webhook Google Sheets and form to Google Sheets webhook setups using Apps Script are free and keep form data in one place; form to Airtable webhook via a serverless function or Airtable Automation (where available) does the same for bases. Real-time updates mean your team sees new form submission to Sheets or new Airtable records as soon as someone submits in 2026.
Conclusion
Key takeaway: Use webhooks to sync form data to Google Sheets or Airtable in real time—no export, no manual copy. Expose an HTTPS endpoint that appends to Sheets or creates Airtable records, add that URL as a webhook in your form, and every submission will sync automatically.
Try AntForms to add a webhook to your form. For more, read webhooks for developers, send form submissions to CRM, and instant lead notifications with webhooks.